This Halloween DIY Hollow Tree may be a solution for your social distance issues for Halloween 2020. We are all looking for a safe way to trick or treat this Halloween. Let’s not cancel Halloween 2020, let’s adjust how we “Halloween”.
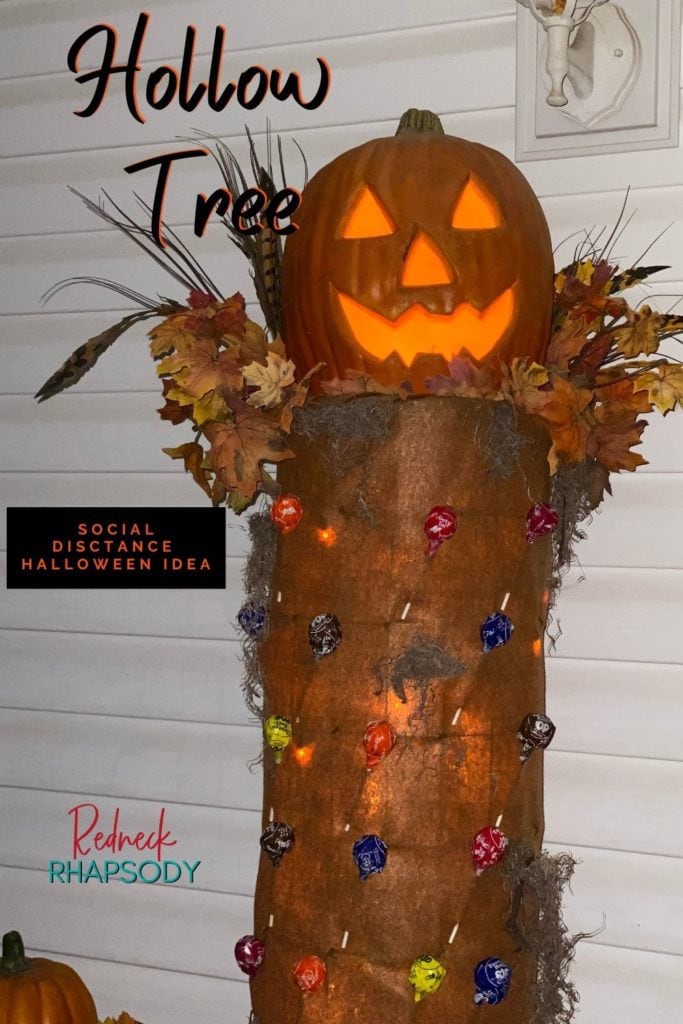
This Halloween DIY project is an easy way to do a simple, social distancing, safe way to trick or treat your “little monsters” who might come to haunt your front porch: Halloween Hollow Trunk Tree. You can keep this project under $10 if you have any of these supplies hanging out around your house like we did.
A DIY Hollow Tree Trunk is One Safe Way to Trick or Treat this Halloween
If you are looking for a safe way to be able to hand out goodies to the kids this year. Then, I have a few ideas for you. I hope you can find one that will work for your family and you. Now, let’s get to the details on how to put this DIY Hollow Tree Trunk together.
What Will You Need to Make Your DIY Hollow Tree Trunk?
- Welded Wire – Approximately 4′ x 3′ piece (this will vary on size of container you choose and tree you want) is 2″ x 4″ squares
- Bucket/Trash Can (container for base of structure)
- Dirt/Rocks/Concrete Block (weight the in the container)
- Zip Ties
- Felt: Brown or Grey – will vary 36” x Enough to cover the height of wire for your tree and the container.
- Chenille Stems/Pipe Cleaners: 10-20 -Color that will best match felt you choose.
- Suckers (candy)
- Plier/Wire Cutter Pack
- Exacto Knife
- Binder Clips
- Safety Pins
- Scissors
- Hot Glue Gun
- Spanish Moss
- White Mini Lights
- Halloween Decor of choice

Where Shall I Start on My DIY Hollow Tree Trunk?
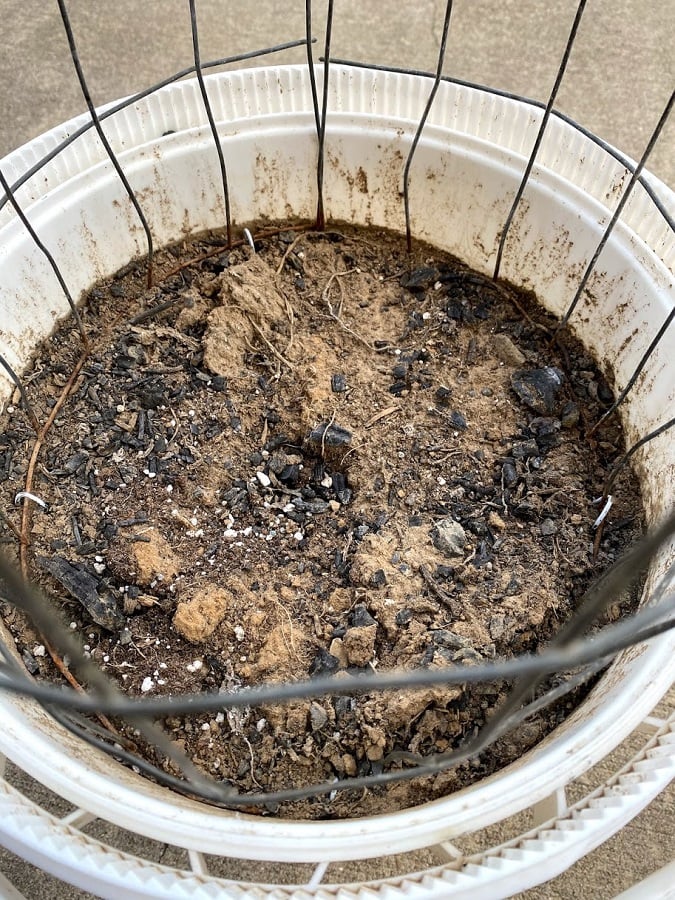
I started with a bucket. They can usually be purchased for five bucks at your local home improvement store. Mine was an empty pool chemical bucket, but you could use a flower pot, paint can, or possibly a trash can. Whichever you choose will determine the size of your tree trunk.
Halloween DIY Hollow Tree Balancing Act
You will need to adjust the height, so that it does not overwhelm the base to upset the balance. Take into account that once you add candy to the trunk that there will be additional weight.
Keep the candy all the way around or else that will be throwing it off. You will have to add extra support to the back side of the DIY hollow tree trunk, if you are just wanting to add candy to only the front.
Framing Up Your DIY Hollow Tree Trunk
You’ll need a piece of wire to build the frame for your hollow tree trunk. I used welded wire that is four feet high. We actually always have extra pieces around the shop. Leftovers from a fence change is what I am using.
Chicken wire would probably be a little too flimsy for the project. Perhaps you have an extra or old tomato cage. It could be used too with just a few small adjustments.
For the size of my bucket I used a piece that is 35.5 inches wide to round for the circumference, which is 11 inches. I used zip ties to hold the wire closed.
Let’s Decide How to Stabilize and Secure It.
To hold the wire in place and weight the bucket down you could choose rocks, concrete blocks, dirt or many other things. I picked dirt.
An old wire hanger was cut into 4 pieces approximately 10 inches long. I used all 4; bent them in half and pushed them down over the base of the wire that was setting on the dirt inside the bucket.
To add extra stability for the wire to the bucket I used four zip ties that I placed equal distance around the rim. My bucket happened to have a lip that made this super easy.
If your bucket doesn’t have a space for this then I suggest drilling four holes that the zip tie can run through and attach to the wire. Tighten securely for balance and stabilizing your DIY hollow tree trunk.
If you decide to use rocks or concrete blocks; you would push the wire further down in the bucket before adding rocks or blocks. You should probably wait to attach the zip ties that will hold your wire cylinder at the back until after this step for convenience.
Should you be using a tomato cage you could lay all of it on it’s side to add weight. Unless you have someone around who’s long armed.
Now, On to the Fun Part!
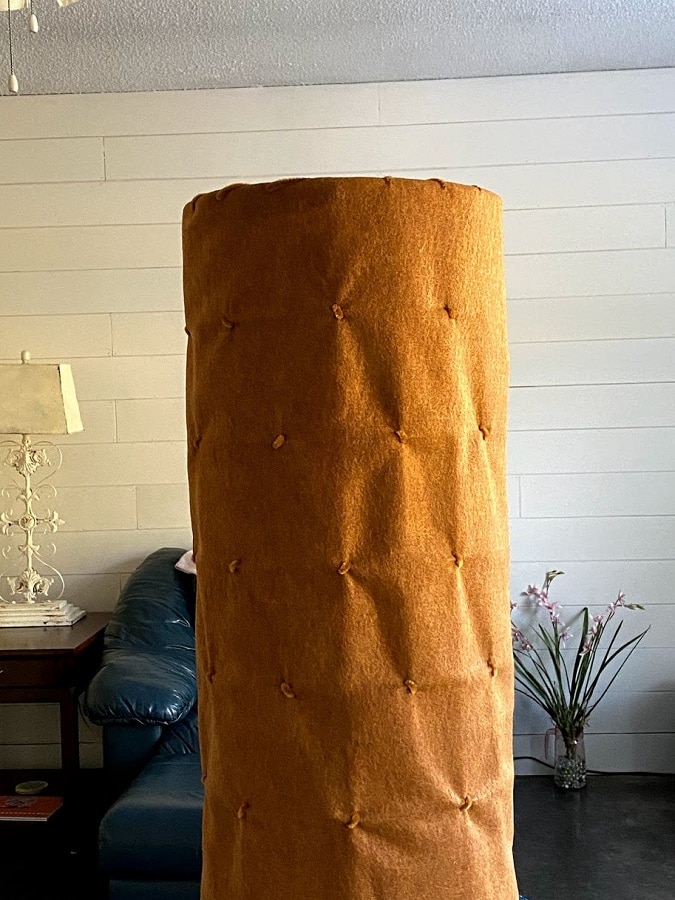
I am choosing to use felt for this project. I had a large piece left after a costume (that did NOT get made) for a gingerbread man last year. If I were buying new I would have chosen a darker brown.
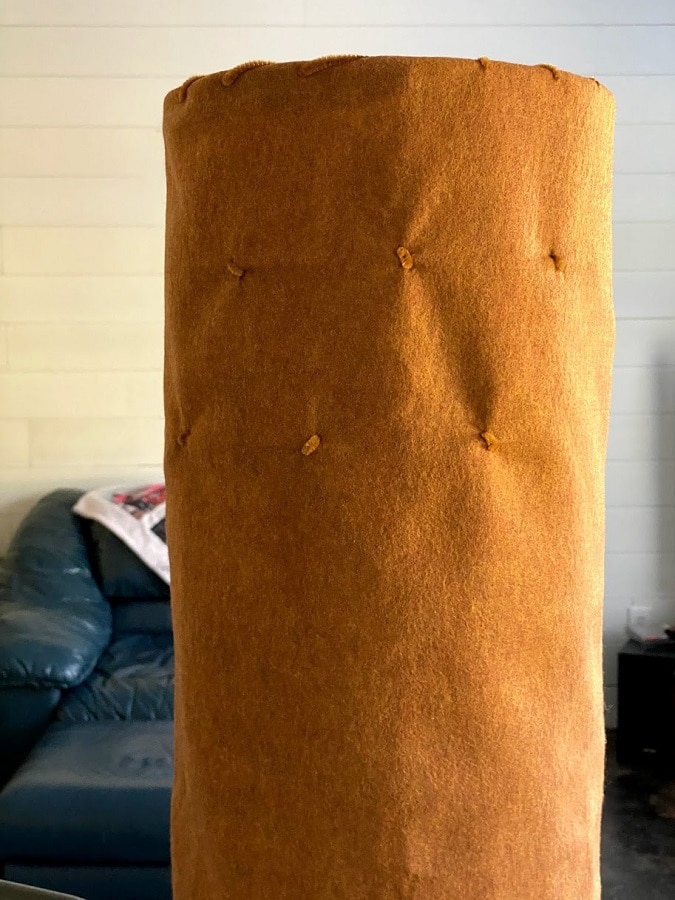
Here are the measurements for the piece of felt that I used: 36 inches x 74.5 inches. The top of the wire and the material fit perfectly, all the way around.
I secured the top for a bit with binder clips (I will be making adjustments as the project progresses.) Just plain safety pins were used down the back Of the DIY hollow tree, for as long as it still met.
I am allowing the material to naturally get further apart in the back for the larger circumference of the bucket. This actually is giving a more “realistic” tree trunk look.
I’m also leaving enough of the material at the bottom to go completely to the ground, plus some. Hopefully, I can use the excess to Spread under my other decorations to look like a tree fading down into what would be roots. That’s the plan, anyway…
Now the DIY Hollow Tree Needs a Little More “Connection”
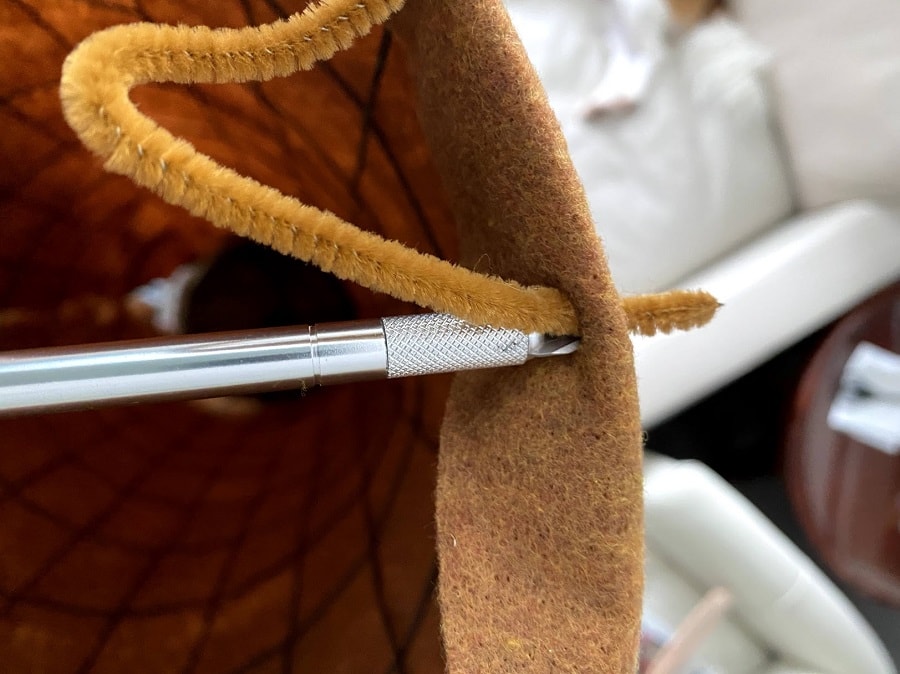
Chenille stems / pipe cleaners are the chosen method that I decided to go with for securing my felt to my wire. I used four stems at the top.
An exacto knife works it’s magic as the perfect tool to not only penetrate the fabric, but also help guide the stems through it. Felt is a little tricky to work with, you can poke a hole in it and it just disappears. Like it swallows it back up.
You almost have to make a cut if you want it to remain. Which is what I would need for the sucker stems, but not so much for the lacing and attaching at the top and at the crossed weld spots.
Less is more for not leaving an ugly hole! You will definitely need to get the stem through the material for securing on the back side to look like my project does.
Speaking of the cross welds I alternated every other one on each row of the wire, then when I went to the next row did the opposite alternation. Pictures should help with this or the video makes it more understandable.
I cut my chenille stems into fourths for this part. Use wire cutters for this, not scissors. It’s totally up to how you want your project to look. It will also depend on what type of candy you want to put on your DIY Hollow Tree.
Knowing that I did not want a lot of weight on mine I went with suckers and would not need the stems to play a role in this part of my project. I just needed mine to secure the felt to the wire frame.
Alternative Option: You can leave the stems longer, pull them through the back/inside of the wire, then pull them to the outside of the tree. They could be used to twist any type of candy to the tree. I would stick to small light items, such as Smarties, Sweet Tarts or Pixie Stix, if you don’t want suckers.
Let’s Accessorize this Hollow Tree to Look Hauntingly Sweet!
Suckers, suckers and more suckers are what I’m using for my social distance Halloween Hollow Tree! There are so many, you can do any type that you like or mix them all up.
I used the stem of mine to gage where to make my small slits in the fabric. Don’t make the cut itself too large or they won’t stay in place well.
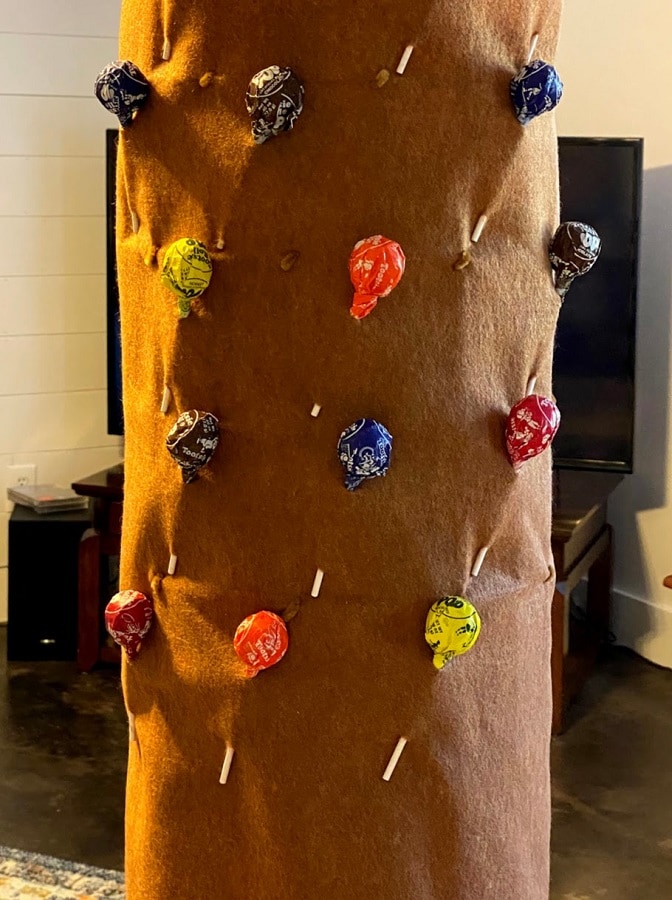
The cuts need to be close enough that both ends will be able to fit through to hold each sucker securely. Make sure the distance between the cuts isn’t too far either.
If you are choosing the route of using the chenille stems to hold candy in place, rather than the slit and sucker method (yeah, no comment – just laugh and move on). I would stick to small light items, such as Smarties, Sweet Tarts or Pixie Stix, if you don’t want suckers.
No matter what tasty Halloween treat you put on here for your trick-or-treaters, don’t leave them outdoors overnight. Especially if you live in an area where it’s damp. The wrappers, nor candy maintain their quality when exposed to moisture.
This Hollow Tree Should Look More Decked Out
When all the necessities were completed I decided we need to make this DIY project look a little more Halloween / Fall appropriate. It was just a little no A LOT boring.
I dropped a stand of lights down the center of the Hollow Tree. Using the chenille stems I just secured them in a couple of spots without much thought of placement. Make sure the plug can be reached though and opening in the back or cut in the felt where it won’t be seen.
Having years of Halloween decorations I actually already had the lit Jack-O-Lantern pumpkin that was placed at the top. How lucky can you get that he was a perfect fit??? He was secured with a couple of chenille stems, inside of the wire cage to make sure he would not sink too much.
He was looking a little bland… Therefore I wanted to give him some texture and color. The Dollar Tree had the perfect stem for just this. I used a couple on each side, which slid right between Ole’ Jack and his nest in the top of the Hollow Tree.
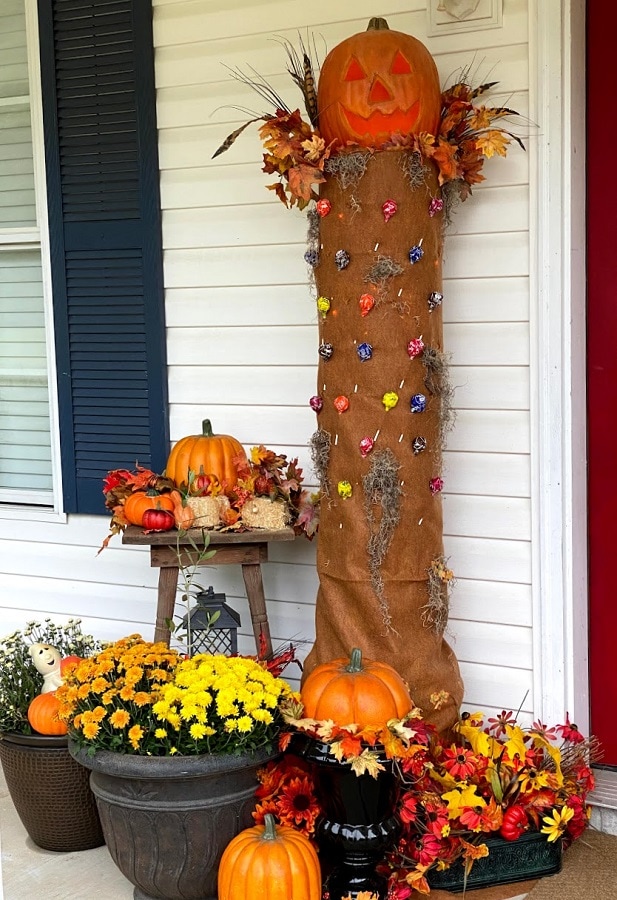
The tree itself was still looking a little forlorn, hence the hot glue gun and spanish moss. I went ahead and put the sucker into place where I could see that I wanted to add the moss. Just put a dot or two of glue where you want moss, then carefully stick a small portion to it.
If you have a “hot” hot glue gun please be careful. The moss is not thick enough to keep the glue from landing on an exposed finger. Yep, I have the blisters to prove it.
My never ending love hate with the hot glue. I love it for DIY projects of all sorts, but I HATE to get it on my fingers. The “strings” it leaves behind, geez louise. I could however NOT live without one.
This DIY Hollow Tree is looking quite lit and Halloween ready now! All he & Jack need are little ghouls and goblins to come get the goodies!
Don’t Cancel Halloween 2020… Adjust It! More Ideas for a Safe Halloween for Social Distancing:
Sucker Stop

DIY Halloween Over the Door Hanger
DIY Dollar Tree Pumpkin Pickin’

I have a few other ideas that I have shared over the past few posts. Yep, there’s another one or two still to go! I hope you can find one that suits your family to keep you all healthy Halloween while trick or treating.

Refreshments While Giving Service with a Smile:
NO contact; yet fun and effective is what we are striving for at our home this 2020 Pandemic Halloween. The porch is appropriately set for over 6 feet distance. Appetizers are going to be prepared.
The Witch’s Brew will be in the cauldron or else we will be sipping on a Loaded Hot Chocolate if the temperatures cooperate. OH and I almost forgot – the Adult Trick or TREATS… Candy Corn Jello Shots & Caramel FILLED Apple. The perfect sweet Halloween Treat for my own personal Goblin(Prince Charming)!
Make Sure that Halloween 2020 Is Safe!
Hope this has inspired you to find ways to have a fun and Happy Halloween this year! May you stay safe while trick-or-treating by being able to social distance in a great way!


This looks like a great option to hand out candy without the risk of breaking social distancing guidelines. Who would have guessed that this year would have turned out this way, but here we are… All we can do is make the most out of the cards we’ve been dealt. Right? At least the idea of wearing a mask isn’t all that weird on Halloween!
It has been a crazy year! But at least we can feel “normal” in the mask.